Building and deploying this website
Static site deployment with Blogdown and AWS CI/CD
By Tom Pisel in webdev project R
September 20, 2021
Through learning R and getting comfortable writing mostly in markdown, I decided to move away from my aging LAMP-stack website and try out something more modern.
This site is built with Hugo Apéro, compiled with RStudio’s blogdown, and deployed as a static site via AWS.
To do this, I relied on the excellent blogdown book, as well as AWS documentation on Building a CI/CD pipeline for Hugo websites.
Building a site in blogdown
install.packages("blogdown")
I used blogdown, which is an R-flavoured wrapper around the Hugo static site generator.
Hugo is a framework for generating static sites from markdown. The HTML of each webpage is generated from a markdown document within a configurable theme. With blogdown, we can use R Markdown files as the source document, which lets us write R code in embedded code blocks and render the output.
With blogdown installed, I created a new project in RStudio, using the “Blogdown” option. Picking the theme here (Apéro for us) is much easier than initiating with the default theme and trying to migrate the site over to a better one down the line.
From here, the initial configuration options can be edited in config.toml in the root folder, including the eventual URL, title, fonts, color theme, social links, and so on. .Rprofile has some configuration options for how the site is served.
When you serve the site with blogdown::serve_site(), it’ll start a server and show you it in the Viewer pane in RStudio (which can be popped out to a web browser).
Generating the site will add the following subfolders of interest:
| Folder | Purpose |
|---|---|
| /content/ | The site content, with each page detailed in an index.md file. Assets like images are stored alongside, and the subfolder structure dictates the hierarchy (e.g. blog posts in a blog section). |
| /themes/ | Theme content that can be overwritten by replicating the relevant files here in the root directory. |
| /static/ | Resources such as images and fonts to be accessed globally. |
| /public/ | The static HTML site content generated by blogdown/hugo. This is all that is needed to host the site online. |
| /resources/ | Documents generated while serving the site that can be safely ignored. |
The latter two folders can also be ignored by version control, as we’ll generate the site content as a part of the deployment process.
The .gitignore I’ve used is as follows:
/resources/
/public/

.DS_Store
.Rproj.user
.RData
.Rhistory
Thumbs.db
.hugo_build.lock
Deployment
The static site content in /public/ can be hosted in many different ways, and Netlify is a popular free option. To familiarise myself with the platform and take advantage of its automation and CDN, I opted to spin it up in AWS. The architecture, including all the services we used looks like this:
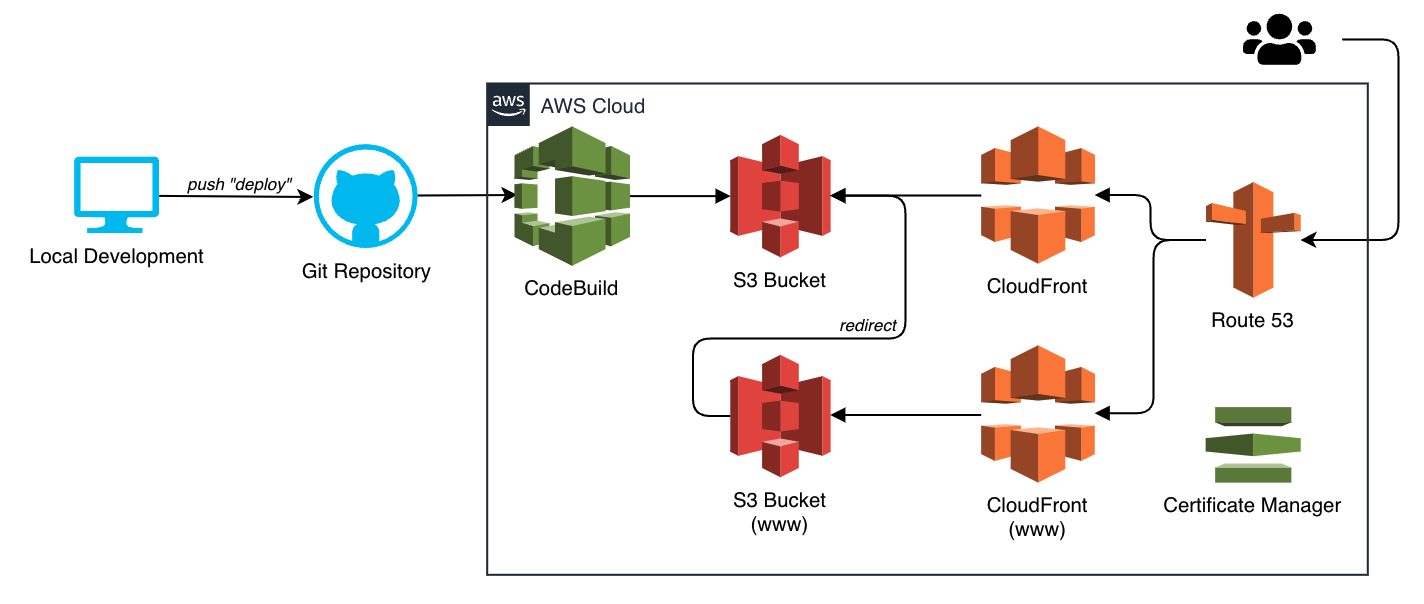
Let’s step through each of these parts in the sequence I set them up in.
S3 Buckets
Two S3 Buckets are needed, one to host the static site content on tompisel.com and one for the subdomain www.tompisel.com which will redirect to the first bucket. Each should be named according to their ultimate URL. For each, we’ll configure them to operate as static sites with full public read access (this will be amended later to restrict access to CloudFront traffic). In the www bucket, under the Static Website Hosting configuration, we set it to redirect it to tompisel.com via https.
CodeBuild
CodeBuild takes the raw site content, where it’s stored in a GitHub repo, builds all the HTML and CSS files, and then copies the contents of that /public/ folder to the tompisel.com S3 bucket. I authenticated access to GitHub by creating a new PAT. On a PUSH event to the repo, where the commit message is “deploy”, the build will be triggered.
I chose a Linux environment to perform the build, with a Python runtime. This is specified in a buildspec.yml file in the root directory, which also provides the instructions for installing and running Hugo with a hugo -v command. Finally, the output directory, /public/ is specified.
version: 0.2

phases:
  install:
    runtime-versions:
      python: 3.8
    commands:
      - apt-get update
      - echo Installing hugo
      - curl -L -o hugo.deb https://github.com/gohugoio/hugo/releases/download/v0.92.1/hugo_extended_0.92.1_Linux-64bit.deb
      - dpkg -i hugo.deb
  pre_build:
    commands:
      - echo In pre_build phase..
      - echo Current directory is $CODEBUILD_SRC_DIR
      - ls -la
  build:
    commands:
      - hugo -v
artifacts:
  files:
    - '**/*'
  base-directory: public
In the AWS console, the artifact upload location is specified as the S3 bucket. We can test
Route 53
Route 53 performs DNS routing. I created a hosted zone and imported my domain from an external registrar using the email authentication method (though this required adding a previously non-extant webmaster email address). Little additional configuration was required beyond this, as the CNAME records get updated by CloudFront and certificate manager automatically.
Certificate Manager
To enable SSL (https), we generate a free certificate that covers both tompisel.com and *.tompisel.com, so we can use it for https access to both S3 buckets. Somewhat annoyingly, we have to make sure we’re in the us-east-1 region for this part to ensure it’s able to talk to the Route 53 hosted zone.
CloudFront
Tying everything together, CloudFront serves content from the S3 bucket to visitors directed to it by Route 53. CloudFront also enables the https connection by importing the SSL certificate, which wouldn’t be possible just serving the site directly from S3.
We’ll spin up two CloudFront distributions, one pointing at the tompisel.com S3 bucket and the other pointing at the www.tompisel.com bucket. On both distributions we redirect http to https, and we do not set the Default Root Object property. In this step, we create a new Origin Access Identity (OAI), which can be set to automatically update the bucket policy JSON to restrict access to CloudFront.
One mistake I made was using the auto-complete drop-down for the Origin Domain Name to select the S3 buckets. This is incorrect, instead we want to use the bucket urls that are provided in the Static Website Hosting section in S3.
Summary
With all of this in place, we can now add a new blog post just by adding a new subfolder to /content/blog/ with a new markdown or R markdown file, and commit and push the changes with a commit message saying “deploy”. This will rebuild and redeploy the site automatically.